Getting started
Sneakers-PAM v0.1.0-rc.7 is out, published on 2026-11-03. It's a prerelease: expect rough edges before v0.1.0. You can run it as a signed appliance on VMware ESXi or Proxmox VE, or install the same services with Helm on a Kubernetes cluster you run yourself. All the files are on the v0.1.0-rc.7 release page.
A box can stay stuck if it loses power right after the database move that the upgrade to this release runs. Don't cut power during the upgrade to this release or straight after it. It's tracked in sneakers-appliance#579.
Choose how to install
| Install target | Status in v0.1.0-rc.7 | CPU architecture | Guide |
|---|---|---|---|
| OVA, for VMware ESXi and vCenter | Available | amd64 only | Install on VMware ESXi |
Disk image (qcow2), for Proxmox VE | Available | amd64 only | Install on Proxmox VE |
| Helm charts, for your own Kubernetes | Available | amd64 and arm64 | Installing Sneakers with Helm |
| ISO, for bare metal | Not yet available | none published | none |
| AWS AMI | Being considered | none published | none |
- The appliance is amd64 only. The OVA, the
qcow2and the update files a box downloads (the.binunits) are all built for amd64 (x86-64). None of them runs on arm64. - The Helm charts run on both. Every image the charts install is a multi-arch image for
linux/amd64andlinux/arm64, so they install on a Raspberry Pi 4 or 5 as well as on an amd64 cluster. - There's no ISO yet. A bare-metal install isn't available in this release, and there's no ISO to download.
- An AWS AMI is being considered. There's no AMI today.
Download the appliance
Each guide downloads its image and checks it with sha256sum and cosign. These are the
v0.1.0-rc.7 files:
| File | Size | SHA-256 |
|---|---|---|
sneakers-appliance-0.1.0-rc.7-amd64.ova | 95.4 MiB | 5e9406326b6448f65075a7ea0c3f908f3b8217caaae44106f75d2c3de400cdea |
sneakers-appliance-0.1.0-rc.7-amd64.qcow2 | 228.9 MiB | 42130227966d10f26cd6eaf9c42d8c2ed12ae487740052f7f161e972d52e0709 |
Each file has its .sha256 and .sigstore.json beside it on the release page, and
SHA256SUMS lists them all.
Set up the appliance
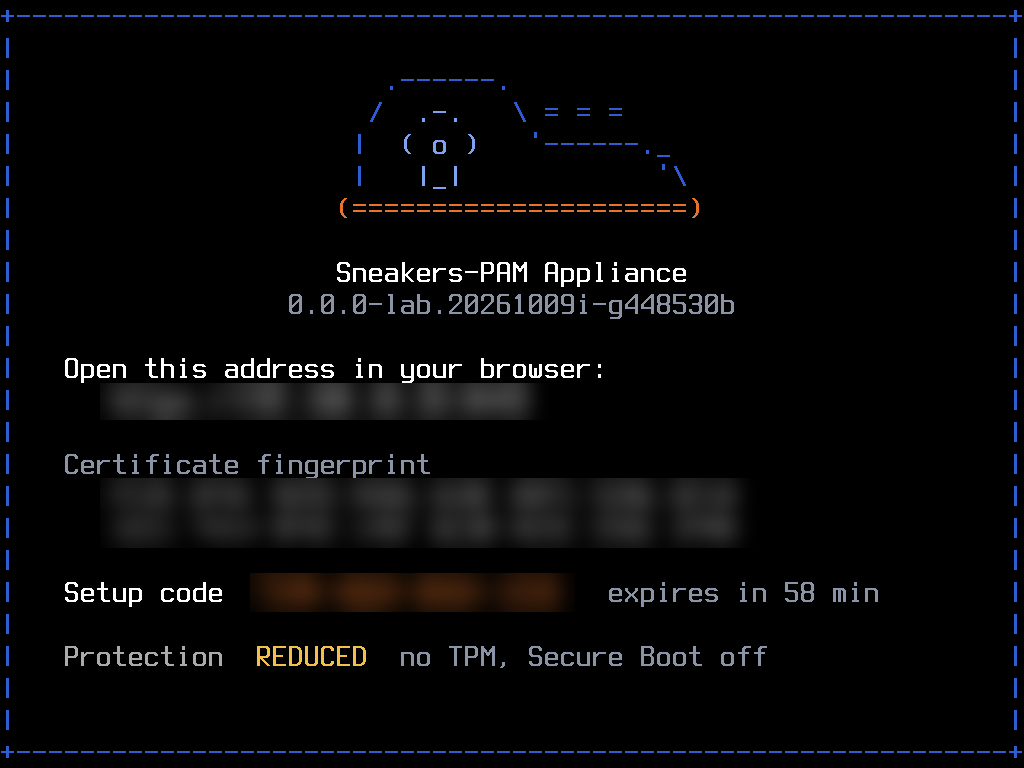
Before you start, deploy the image and boot it with its guide: Install on VMware ESXi or Install on Proxmox VE. The guide ends with the console showing the setup address, the certificate fingerprint and a one-time setup code.
-
Open the address from the console in a browser, such as
https://192.0.2.10:8443. -
Check that the certificate's fingerprint matches the console's, then accept it.
-
Enter the setup code (step 1 of 6) from the console.
-
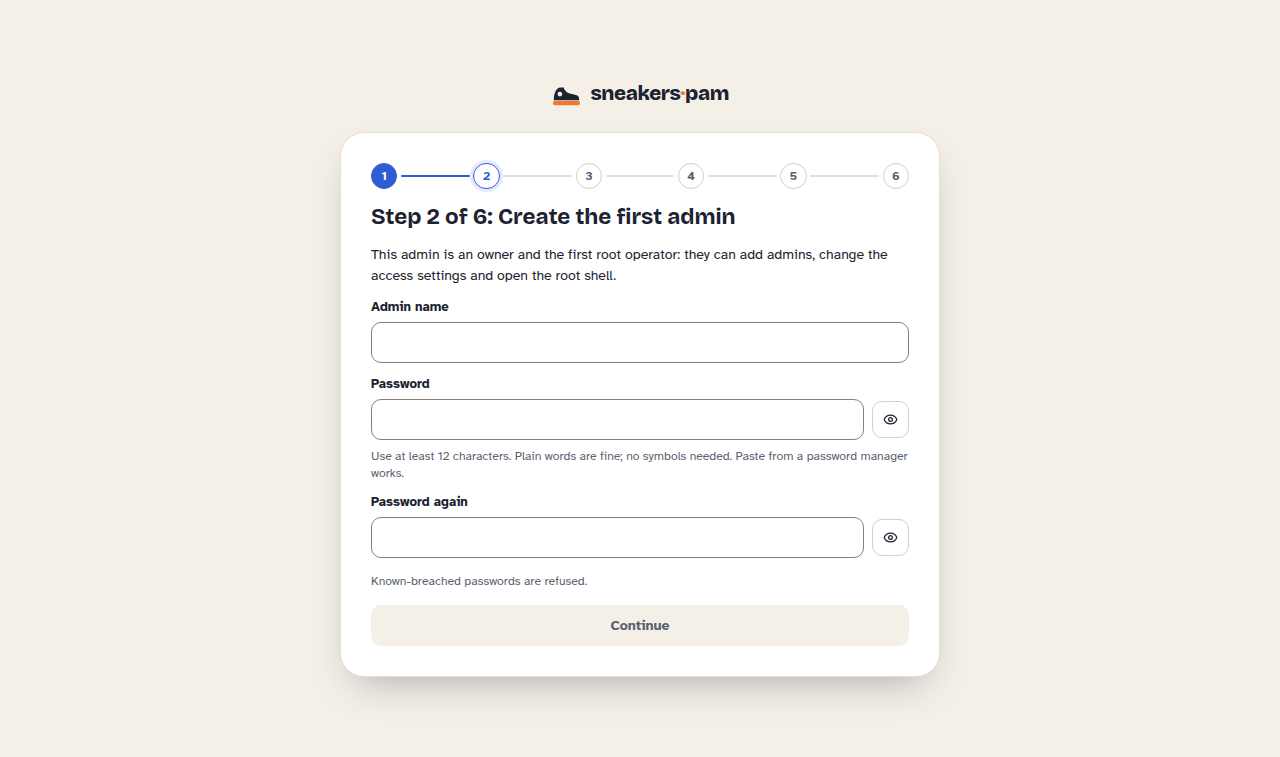
Create the first admin (step 2): a name and a password of at least 12 characters, then add the authenticator app the page shows a key for. This admin is an owner and the first root operator.
-
Add a recovery key (step 3): let the box make one and download it, or add your own. Keep it offline. It opens your backups if the box is lost, but it isn't a login key.
-
Network (step 4) is optional: check the address the box took. You can change the network and the host name later on the Network page.
-
How your data is protected (step 5) shows the protection level: full with Secure Boot and a TPM, reduced with the reason otherwise.
-
Sign in to finish (step 6) with the admin you made. The box moves into normal operation, and the console shows its status screen. It may restart once by itself.
Sign in to Sneakers-PAM for the first time
The appliance's own admin pages on :8443 are separate from Sneakers-PAM itself, which answers on
port 443. Sneakers-PAM has its own first admin, made with a one-time setup token.
- On the
:8443Status page, find Sneakers setup token and choose Show. Over SSH,sneakers setup-tokenprints the same value. - Open the link it gives,
https://<host name>/admin/setup. - Enter the setup token, then your username, display name, email and password. Sneakers-PAM creates the admin and installs its built-ins.
- Enter the code it emails you to verify your address.
- Sign in to the admin web at
https://<host name>/admin, and to the staff web athttps://<host name>/.
The setup token works once. After that, the Status page only says it was used.
Install with Helm
The Helm path installs the same services from the same pinned release on your own cluster. Some things the appliance does for you become yours: upgrades, backups, TLS and the cluster itself. The full guide, with the ingress, TLS and sizing settings, is Installing Sneakers with Helm.
Before you start:
- Kubernetes 1.36 or newer, on amd64 or arm64 nodes, with a default StorageClass and a CNI that enforces NetworkPolicies.
- Helm 3.14 or newer, or Helm 4, plus
kubectl,gitandopenssl. - An ingress controller that terminates TLS for your public host, such as
sneakers.example.org.
The chart is charts/sneakers (chart version 0.1.0) in
Sneakers-PAM/sneakers-release at the
v0.1.0-rc.7 tag. It isn't published to a chart registry yet.
-
Get the charts at the release's tag:
git clone --branch v0.1.0-rc.7 --depth 1 https://github.com/Sneakers-PAM/sneakers-release.gitcd sneakers-release -
Build the charts' dependencies. The script adds the Valkey and Ory chart repositories, builds the shared library into each service chart, then builds the umbrella chart:
scripts/build-deps.sh -
Create the namespace and the vault root key, and keep a copy of the key in your secret store:
kubectl create namespace sneakerskubectl -n sneakers create secret generic sneakers-vault-root-key \--from-literal=VAULT_ROOT_KEK="$(openssl rand -base64 32)" -
Install, with your public host and the release's image tag:
helm install sneakers charts/sneakers -n sneakers \--set global.host=sneakers.example.org \--set global.imageTag=0.1.0-rc.7 \--set vault.secretEnv.VAULT_ROOT_KEK.secretName=sneakers-vault-root-keyOn arm64 nodes, add the values from the guide's CPU architecture section.
-
Check the install:
helm test sneakers -n sneakers -
Turn on the first-run setup with a setup token, as the guide's First start section says, then open
https://sneakers.example.org/admin/setupand follow Sign in to Sneakers-PAM for the first time from step 3.
The appliance admin pages
After setup, the box keeps its own admin pages at https://<address>:8443/, with a sign-in of
their own, separate from your Sneakers-PAM account.
- Getting there as root. Signed in to the admin console as root, open the account menu and
choose Appliance admin. It opens
https://<host name>:8443/in a new tab, using the host name the box reports for itself. No other account gets the item, and it isn't there on a plain Kubernetes install or when the box doesn't know its host name. The link doesn't sign you in: the appliance admin asks for its own sign-in. - No autofill. The browser and password managers (1Password, LastPass, Bitwarden) don't fill in the fields on these pages, so your own sign-in never lands in the email settings' relay username and password. The same goes for the network, backups, certificates, update mirror and access fields and the typed confirmations. Only the sign-in, the last sign-in step of setup, the current password when you change yours, and the authenticator code boxes leave autofill on.
- Recovery keys aren't login keys. The recovery key from setup is one you keep offline, and any
one of them opens your backups if the box is lost. SSH and PuTTY won't accept it. To sign in over
SSH, get a login key from the Access page, which also gives you a
.ppkfile for PuTTY. - Restarts take a while. The box can take more than 5 minutes to come back after a reboot, and
more than 5 minutes to come back when it starts after a shutdown. That's expected. The Power
page and the
rebootandpoweroffcommands say so before you confirm. - Updates. A newer release that's still being published is skipped, with a note above the update cards naming it and why. The box offers the newest finished release instead, and picks up the newer one on a later check, once it's finished.
- Network. A network change is staged, reviewed and then committed. See Changing the appliance's network.
- Support. The Logs page gives you one zip file for diagnosing the box, and the
support-bundlecommand prints the same content as text. See Getting a support bundle.
Updates, backups and telemetry
- Updates. The appliance takes whole, signed releases, applied in a maintenance window you
set or by hand, and an owner can revert one. See Updating the appliance.
On Helm, you upgrade with
helm upgradewhen you choose to. - Backups. From v0.1.0-rc.7 the appliance backs up its database to its own backup partition every night, and an owner can cut, export and restore a named backup set. Exports are encrypted to a separate key from the one you log in with. Nothing is copied off the box on a schedule yet. See Backing up and restoring the appliance. On Helm, backups are yours.
- Built-ins. An upgrade brings new built-ins with it, and you don't run setup again. Each time the vault starts on a set-up install, it adds any built-in secret types, extension packs, connections and password policies the release ships that the install doesn't have yet. It only adds: a built-in you already have stays exactly as it is, even if you edited it, and one an admin deleted stays deleted.
- Telemetry. The services can send traces, metrics and logs to an OpenTelemetry collector you run. Export is off until you turn it on. See Sending telemetry to a collector.
Moving between appliances
sneakers-migrate exports an encrypted bundle from a running Sneakers-PAM install: secrets,
folders, ACLs, users and groups, targets and schedules. The Import page on the new appliance's
:8443 brings it in before the product's own first-run setup, and every secret is sealed again
under the new root key.
The bundle is in format 2.0:
- The audit trail stays on the old appliance. An audit trail belongs to the install that recorded it, so the export leaves it out. Keep the old appliance's history with that appliance, or offline, if you need it after you retire the box.
- The new trail starts with one record. Before anything else, the import adds one "imported from" record: the old appliance's name and version, the bundle's id, who ran the import and when, and how many folders, secrets and users came across. The new appliance's own events follow it.
--source-namesets the name in that record. Without it, the export uses the host name of the machine it runs on.- A bundle in format 1.x is refused. It carries the old trail, so the import stops before it
writes anything. Export it again with a current
sneakers-migrate.
sneakers-migrate export --current-only --reset-sign-in --source-name old-box.example.org \
  --recipient age1... --out real.age
The --recipient value comes from the new appliance's Import page. The whole move, step by
step, is in
Moving onto the appliance.