Install on VMware ESXi
This page deploys the Sneakers-PAM appliance's OVA on VMware ESXi as a new VM and boots it. You clear the VM's Secure Boot keys once in its firmware, and on the first boot the appliance enrols its own. You then turn Secure Boot on, and on the next boot the appliance keeps its disk keys and opens its setup page. You need the ESXi host client or vCenter, and a Linux shell to download and check the OVA.
The OVA deploy, the firmware's Secure Boot steps, the first boot and the console's setup screen were verified on ESXi in our lab rounds. If a step doesn't match what you see, please open an issue with the exact output, and leave out your addresses, host names and any passwords.
Before you start
- ESXi 7.0 U2 or later, on its own (the host client) or managed by vCenter. The OVA is virtual hardware version 19.
- An amd64 (x86-64) host. The OVA is amd64 only, and so are the appliance's update files: it doesn't run on arm64. To run Sneakers-PAM on arm64, use the Helm charts (see Getting started).
- A datastore with 64 GiB free (the disk is thin, so less is used at first), and a port group for the VM's network, with DHCP if you can (you can set an address by hand on the console instead).
- 4 vCPUs and 16 GiB of memory for the VM.
- The release you're installing, such as
0.1.0-rc.7(the tag without itsv), from the appliance releases. - A Linux shell with
curlandsha256sumto download and check the OVA, and a browser that can upload it to the host client or vCenter. - To check the release's signature as well as its checksum, cosign v3 or newer in that shell.
- For full protection, a key provider in vCenter, so the VM can have a virtual TPM (vTPM). Without one, the appliance keeps its disk keys in a key file on its own disk instead (reduced protection).
1. Download the OVA and check it
In the Linux shell, set the release, then download the OVA and its checksum and check it:
VERSION=0.1.0-rc.7
base="https://github.com/Sneakers-PAM/sneakers-appliance/releases/download/v$VERSION"
curl -fLO "$base/sneakers-appliance-$VERSION-amd64.ova"
curl -fLO "$base/sneakers-appliance-$VERSION-amd64.ova.sha256"
sha256sum -c "sneakers-appliance-$VERSION-amd64.ova.sha256"
sha256sum prints OK. To check the release's signature too:
curl -fLO "$base/sneakers-appliance-$VERSION-amd64.ova.sigstore.json"
curl -fL -o sneakers-release.pub "https://raw.githubusercontent.com/Sneakers-PAM/sneakers-appliance/v$VERSION/keys/production/cosign.pub"
cosign verify-blob --key sneakers-release.pub --insecure-ignore-tlog=true \
  --bundle "sneakers-appliance-$VERSION-amd64.ova.sigstore.json" "sneakers-appliance-$VERSION-amd64.ova"
It prints Verified OK, after a warning that the transparency log was skipped: the release key
signs without one. Stop here if either check fails.
The OVA carries no VMware OVF certificate, so the deploy wizard shows no publisher for it. That's expected: the checks above are the ones that matter, and the appliance checks the org's signature again on every boot and every update.
2. Deploy the OVA
Use the host client or vCenter, whichever manages your host.
In the ESXi host client:
2.1 Open Virtual Machines, then Create / Register VM.
2.2 Choose Deploy a virtual machine from an OVF or OVA file, name the VM (such as
sneakers-appliance) and select the .ova file you downloaded.
2.3 Pick the datastore, then on Deployment options pick the port group, keep Thin disk provisioning and clear Power on automatically.
2.4 Finish the wizard and wait for the upload to complete.
In vCenter:
2.1 Right-click the cluster or host and choose Deploy OVF Template.
2.2 Choose Local file and select the .ova file you downloaded.
2.3 Name the VM, pick the compute resource, the datastore (keep Thin Provision) and the port group.
2.4 On Customize template, fill in Host name and Domain if you want the appliance
to start with them, such as box1 and example.org. You can leave both empty and set the name
later. Finish the wizard. vCenter doesn't power the VM on.
The host client has no such fields, so there the appliance names itself sneakers- and eight
letters and digits until you set its host name on its Network page.
3. Check the VM's settings
Open the VM's Edit settings before you power it on. The OVA sets up:
| Setting | Value |
|---|---|
| CPU | 4 vCPUs |
| Memory | 16 GiB |
| Hard disk | 64 GiB, thin, on a VMware Paravirtual (PVSCSI) controller |
| Network adapter | VMXNET 3 |
| Firmware | EFI, with Secure Boot off for the first boot |
| Advanced | uefi.allowAuthBypass set to TRUE for the first boot |
3.1 Give the VM more CPU or memory now if you want to. Don't go below the values above.
3.2 To give the appliance more than 64 GiB, grow the hard disk now, before the first power-on. The first boot gives the extra space to its data and backup volumes.
3.3 For full protection, add a Trusted Platform Module (Add other device), if your vCenter has a key provider. The appliance then seals its disk keys to it. Without one it asks no question and keeps them in a key file (reduced protection).
3.4 On VM Options, Boot Options, tick Force EFI setup (during the next boot, enter the EFI setup screen). Save.
4. Clear the firmware's Secure Boot keys
A new VMware VM starts with VMware's own Secure Boot keys, which also trust Microsoft's. The appliance never trusts those, and it can enrol its own keys only once the platform key (PK) is gone.
4.1 Power the VM on and open its console. It opens the firmware's Boot Manager.
4.2 Choose Enter setup, then Secure Boot Configuration, then PK Options.
4.3 Choose Delete PK, and untick VMware Default PK.
4.4 Save, leave the setup screens and go back to the Boot Manager, then boot the VM's hard disk.
5. First boot: Secure Boot keys
After a short while the appliance shows a Secure Boot screen with 1. Use Secure Boot with the org keys (recommended) selected. Press Enter.
It writes its keys and shows Secure Boot keys enrolled. Power the VM off, turn on Secure Boot, remove uefi.allowAuthBypass, power it on. It waits for you there.
5.1 Power the VM off from the host client or vCenter. Nothing is set up yet, so this is safe here.
5.2 Open Edit settings, then VM Options, Boot Options, and turn Secure Boot on.
5.3 Under VM Options, Advanced, Edit Configuration, remove uefi.allowAuthBypass,
or set it to FALSE. Save.
5.4 Power the VM on.
To run without Secure Boot instead, type no secure boot at the Secure Boot screen and press
Enter. Then power the VM off, remove uefi.allowAuthBypass as in 5.3 and power it on again. The
appliance runs with reduced protection, and you can turn Secure Boot on later from its admin page
without reinstalling.
6. Second boot: the disk keys and setup
With a TPM, the appliance asks where to keep its disk keys, with Use the TPM (recommended) selected. Press Enter. Without a TPM the key file is the only choice: press Enter to go on.
It formats its data volumes, takes an address by DHCP, then shows the protection, the setup
address (https://<address>:8443), the certificate fingerprint and a one-time setup code.
Protection: full needs Secure Boot and a TPM. On a host without a vTPM it shows REDUCED with
the reason. Everything else works the same way.
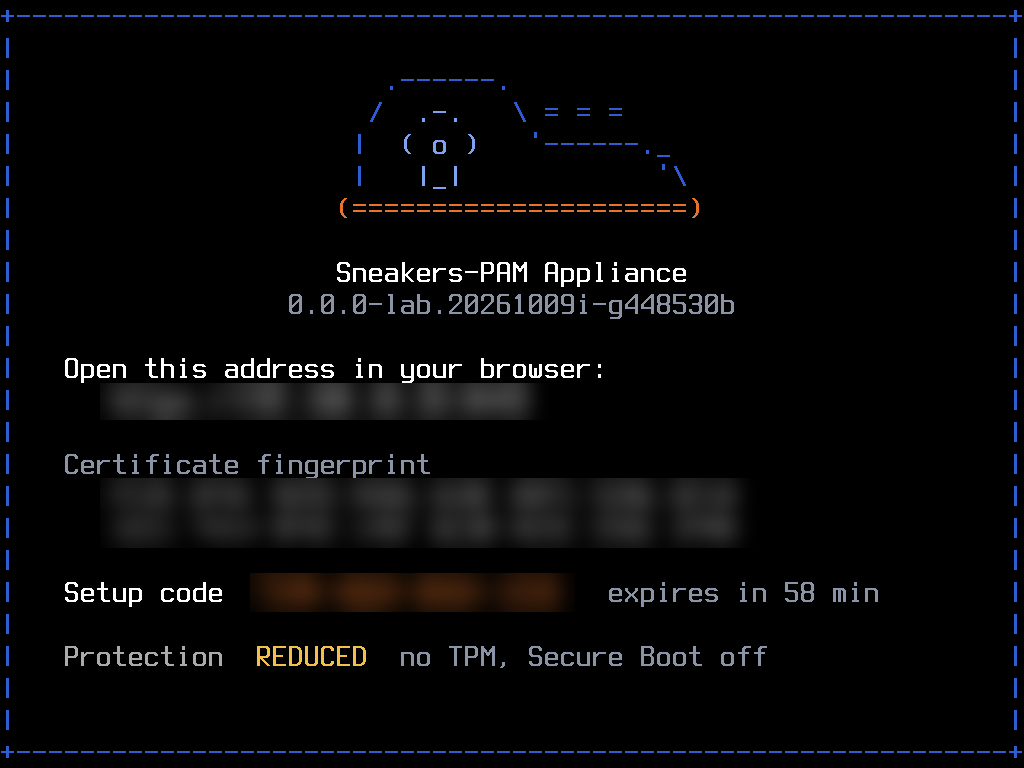
The code is 16 characters and never uses 0, 1, G, I, L, O, Q or U, so look-alike
characters can't trip you up. It lasts 60 minutes, and the console shows a new one when it runs
out.
If DHCP gives the appliance no address within 30 seconds, the console lists the network ports. Press N and Enter to set an address by hand, or R and Enter to try DHCP again.
7. Open the setup page
7.1 Open the address in a browser, such as https://192.0.2.10:8443.
7.2 Check that the certificate's fingerprint matches the one on the console, then accept it.
7.3 Enter the setup code and follow the setup steps: the first admin with an authenticator app, a recovery key, the network, how your data is protected, and one sign-in to finish. Getting started walks through each one.
The recovery key you make or add here isn't a login key, and SSH and PuTTY won't accept it. Keep it
offline. For SSH, get a login key from the Access page once setup is finished; it comes with a
.ppk file for PuTTY.
8. Run it day to day
- No VMware Tools. The appliance doesn't run VMware Tools, so the host client and vCenter don't
show its IP address, and Shut Down Guest OS and Restart Guest OS don't reach it. The
console shows its addresses. To stop or restart it, use the Power page on
:8443, or thepoweroffandrebootcommands over SSH. Power the VM off from ESXi only when the appliance can't be reached. - Restarts take a while. After a restart, or when you next start it after a shutdown, it can take more than 5 minutes to come back. That's expected.
- Updates. The appliance downloads signed releases itself and applies them in your maintenance window. See Updating the appliance.
- Backups. It backs up its database to its own backup partition every night. See Backing up and restoring the appliance.
A box can stay stuck if it loses power right after the database move that the upgrade to v0.1.0-rc.7 runs. When you upgrade an earlier appliance to this release, don't power the VM off or reset it during the upgrade or straight after it. It's tracked in sneakers-appliance#579.
If something goes wrong
- The Secure Boot screen has nothing selected and says the firmware isn't in Setup Mode: the
platform key is still there. Type
1and press Enter to see the steps, then power the VM off, tick Force EFI setup again and repeat step 4. - The console goes back to the Boot Manager with no error: Secure Boot was turned on before the
appliance enrolled its keys, and the firmware refused to boot it. Power the VM off, turn
Secure Boot off, check that
uefi.allowAuthBypassisTRUE, and start again from step 3.4. - The console says Secure Boot is off, but this box is set to use it: Secure Boot was turned
off in the VM's settings after setup. Turn it back on. To run without it, turn it on, sign in to
:8443and turn Secure Boot off there. - Protection shows
REDUCEDwith no TPM, and you meant to add one: the appliance chose the key file on its second boot, and that choice stays with the install. To use a vTPM, deploy a new VM from the OVA with the TPM added in step 3.3.
The appliance repository keeps the details behind these steps in docs/secure-boot.md and docs/formats.md.